
Are you ready to turn your Raspberry Pi into a high-performance Wi-Fi hotspot that can compete with expensive prebuilt models? Join me as I walk you through the straightforward steps I took to create my WPSD Raspberry Pi Hotspot! For less than $150, you can unlock the potential of a powerful hotspot that saves you money while delivering excellent performance.
I’ll share the exact components I used, along with helpful links for each part, so you can easily follow along. Trust me, having the right hardware makes all the difference! Along the way, I’ll provide tips and tricks that helped me overcome challenges and optimize my setup. Don’t miss out on this chance to unleash your tech skills and create something amazing. Let’s dive in together and explore the possibilities—click on the links to get started!
Step 1: I used the following components.
- The base is a Raspberry PI 3B single-board computer.
- The power supply for the Raspberry PI.
- The radio transceiver is an MMDVM Duplex Hotspot Dual Hat Module with a 0.96 OLED Display.
- The case I am using is Zebra DRPi-1s (Black Ice).
- The MicroSD card I am using is SanDisk Ultra 16 GB.
Step 2: Visit Chip’s website and read about the WPSD project.
Step 3: Assembly of the basic components.
- When your parts arrive, you must carefully attach the MMDVM transceiver hat to the Raspberry PI single-board computer. This is done by simply lining the pins from the MMDVM transceiver hat up with the receiving socket on the Raspberry PI single-board computer and gently pressing them together. It’s easy—no soldiering or anything like that. Just be careful not to bend the pins. Take the time to line it up carefully.
- This is a good time to assemble the case. The board and hat assembly are installed in the case as it is being assembled.
- DO NOT install the Micro SD card during this step.
- DO NOT connect the power adapter during this step.
Step 4: Download the WPSD image file that works with the hardware components I have listed above.
- This is the direct link to the specific image you need.
- Make a note of the directory where you downloaded the compressed image file.
- Once the download is complete, you need to unzip or decompress the file. Depending on the operating system on the computer you are using, you may be able to right-click the newly downloaded file ending in “xz” and choose “extract here.” Otherwise, you will need to download a tool that can unzip the file. You can’t flash the image to the SD card until it is extracted and has only the img extension. I have included some examples below of software that you can use to unzip the file.
Step 5: Flash the WPSD disk image to your Micro SD card.
- This step bundles the WPSD software with the Raspbian OS onto your Micro SD card, which will act as the hard drive for your hotspot. This dramatically simplifies the installation of the OS and WPSD software, which will occur mostly automatically once you install the SD card into your Raspberry PI and connect it to power for the first time.
- To easily flash the IMG file onto the SD card, you need free software used for making bootable media.
- Download and install the imaging software you chose above.
- In your imaging software, choose the source WPSD IMG file located in the directory you noted earlier.
- Install your Micro SD card into your computer, often done using a USB adapter.
- Choose your Micro SD card as the destination device for your flash.
- Choose the “start” or “flash” option.
- Once you have successfully flashed the WPSD IMG file onto your SD card, install the card into the SD card slot on the Raspberry PI.
- DO NOT connect the power adapter during this step.
Step 6: Connect the Raspberry Pi to your home router using an Ethernet cable.
- I recommend connecting your Raspberry PI directly to your home router using an Ethernet cable BEFORE you initially boot it. This will allow it to pull an IP address using the router’s DHCP server. You will manage your hotspot using the web browser on your computer. This is possible because the hotspot has a little web server built in. Don’t worry, we will discuss how you can connect your hotspot to wireless in later steps so that you can use it with your mobile.
- DO NOT connect the power adapter during this step.
Step 7: Connect power to your Raspberry Pi and wait 10 minutes for it to boot.
- Keep in mind your OLED screen WILL NOT WORK yet, we will set it up later.
- You should be fine if you see flashing LED lights on your MMDVM board and your Ethernet adapter. Let the software boot. This could take a good 10 minutes because the Raspberry PI is unpacking the Linux operating system onto the SD card. Don’t worry, booting the hotspot will be faster in the future. Do not power off the Raspberry PI during this step.
- PRO TIP. If you want to watch the Raspberry PI boot, connect a monitor or TV using an HDMI cable. This isn’t required, because you can just let the installation complete and put http://wpsd.local into a computer’s web browser connected to the same network you have the Raspberry PI connected to. This should prompt you for the login to the dashboard. However, having that monitor will allow you to see when the software has finished installing and booting, it will also tell you what IP your Raspberry PI has acquired from your DHCP server.

Step 8: Perform the initial configuration of WPSD with your information.
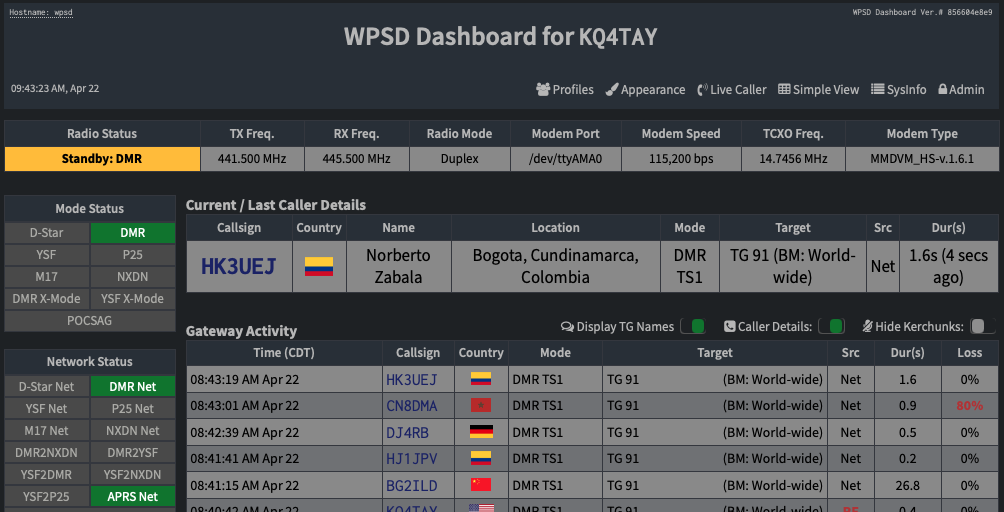
- Enter http://wpsd.local/ into your computer’s web browser. This should prompt you for a login. If, for some reason, you do not get prompted to log in, double-check and make sure your computer and your Raspberry PI hotspot are connected to the same network.
- If you still aren’t prompted to log in, try entering the direct IP assigned to your Raspberry PI by your DHCP server into your web browser. If you have a monitor connected to the HDMI port of your Raspberry PI this IP will be displayed on the far right side of the screen.
- Once you get the prompt, login for the WPSD dashboard is as follows: Username: pi-star, Password: raspberry.
Step 9: Configure the general settings and the OLED screen on your Raspberry PI.
- Navigate to Admin (top right of dashboard) then to Configuration (same spot)
- Fill out the general settings like this. Make sure to enter your real call sign and DMR ID.
- You can adjust the frequencies to whatever UHF frequency you want, but ensure you operate within your FCC limits and the band plan.

- Now, configure your display settings exactly like this, assuming you are using the hardware I recommended.

- Scroll to the top, click apply. If prompted, click save for the profile. Your radio should reboot, and you should start seeing text on your OLED screen. If so, congratulations. If not, go back to the top and read through again.
Step 10: Adding your first digital networks to the Raspberry PI hotspot running WPSD.
- There is a knowledge article in the official manual that covers this topic. Check this out first.
- ^^This article does a great job of telling you how to get going with DMR, seriously go read it^^
- Sign up for a DMR ID from RADIOID.NET (The same DMR ID works on multiple public and private networks. If you already have a DMR ID from RADIOID, use that one.)
- Sign up for a BrandMeister Account
- Log in to the BrandMeister Dashboard and navigate to Selfcare>Hotspot Security. On your screen, you will see a “hot spot security field.” Create and save a pin in there. You must enter this PIN in the DMR configuration section of your hotspot in order to connect to Brandmeister.
- Back at your hotspot dashboard, navigate to Admin (at the top right of the dashboard), then to Configuration (in the same spot). Then scroll down to Radio/MMDVM Modem Configuration. Make sure the DMR mode is enabled and the Primary DMR Network is set to BrandMeister.

- Now, scroll down further to DMR configuration and set it up like this. Make sure the BrandMeister Network Enable is turned on. Enter the security pin you created from the BrandMeister selfcare dashboard here. Click Apply at the top of the page to save changes.

Step 11: Connecting your Raspberry Pi to WIFI.
- To connect to WIFI, scroll to the bottom of this page and click the Add connections drop-down menu and click Scan and Add.

- Locate the wireless network of interest, in the field next to it labeled “enter passphrase,” type your WIFI password. Then click Add this network. This will save the WIFI network in the list of networks that the hotspot automatically connects to when it powers up if there is no Ethernet cable connected.

Step 12: Using your smartphone’s built-in WIFI to set up your hotspot mobile.
- You can enable the wireless hotspot on your cell phone and use it as the internet connection for the Raspberry PI hotspot while you are mobile. While your hotspot is still connected to the Ethernet cable, enable the hotspot on your phone. Search and save the network using the same process you used for your first WIFI network. Now its saved and will be tried from now on when you power on the hotspot.
- While your WPSD hotspot is connected to your phone’s hotspot, you can connect to and manage WPSD using your phone’s web browser by navigating to the IP displayed on your hotspot’s OLED display.
- Chip also has a handy tool that simplifies this process quite a bit.
- ***The WPSD interface is very sensitive to the SSID format. Avoid special characters, spaces, or combinations of capital and lowercase letters. If you know you are doing everything correctly, and your WPSD hotspot refuses to connect to the personal hotspot on your phone. Try making your SSID on your phones hotspot something straightforward, if just for testing—example SSID: abcd Password: 12345678. You can always change it later, but use something simple to confirm the hardware is working correctly. ***
Step 13: Save a back up of your configuration!
- Navigate to Admin>Configuration>Backup/Restore and save a back up on your computer.
Information on safely powering down your hotspot. Whenever possible, you should gracefully power down the hotspot by using your web browser to navigate to Admin (top right) > Power (top middle) > Giant power button. Click the giant shut down button and wait until your OLED on the hotspot says “safe to power down.”

Step 14: Program your radio’s code plug
- Now you must add the hotspot to your radio’s code plug. You’ll need to follow the instructions in your radio’s manual on adding a DMR repeater using the frequencies you created while setting up your radio.
- Basics for DMR channels
- Frequencies and offset
- All talk groups should be set to group call, except parrot or echo
- Color code
- Talk group
Discover more from Jarrod Andrews
Subscribe to get the latest posts sent to your email.